Installation Instructions for Trimmers with Plastic Fixed Line Heads
The following instructions are for trimmers, straight or curved shafts, that come with a plastic fixed line head. Fixed line heads are those that take 1 or 2 short pieces of line threaded through the head. Once the line wears out you remove the old piece(s) and stick new one(s) in. They have no spool, spool housing or bump knob.
Some CubCadet, Murray, Remington, Poulan Pro and MTD trimmers come with these types of heads.
You can check the Brands section to see if your particular brand and model follows these instructions. From this point forward we'll use the term "trimmer" for any trimmer that follows these instructions.
DO NOT REMOVE THE DEFLECTOR SHIELD. We removed the deflector shield and / or used different trimmers on the pictures for clarity purposes.
Your trimmer may not look exactly as the ones illustrated.
Trimmers with fixed line heads pose a particular installation problem: if the original head is removed, the shaft is too long to follow the straight shaft instructions and since there's no spool housing to leave on, we can't follow the curved shaft instructions either. We developed an adapter kit to fix this issue. Due to the way the kit is installed and the extra weight on the longer shaft, we only recommend the following GrassGator heads: 3600, 8010, 5600, 5620 or 4700. This installation method requires a GrassGator head that's open on the bottom to accommodate a plastic adapter. Our Bump & Feed heads or the Ultimate head don’t have an open bottom and thus will NOT work on these trimmers.
If your trimmer comes with a Fixed Line head then you can request a kit free of charge by e-mail techsupport@cmdproducts.com.
Once you receive the adapter kit in the mail follow the instructions below.
Remove Original Head
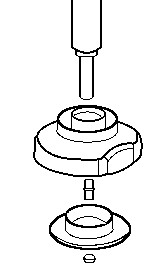
To remove the original head start by unscrewing the bottom lock nut. Then remove the spacer, double sided bolt and finally, the head itself. You should end up with a long shaft (about 2") threaded on the inside
Find the Correct Fastener
The GrassGator kit comes with a pack of 7 nuts and 2 bolts. Most, if not all, fixed line head trimmers have a shaft that's threaded on the inside (female). Find the bolt from the kit that fits the shaft. Once you find the correct nut or bolt, set it aside.
If:
- None of the bolts fit the shaft of your trimmer try them again but this time screwing them to the left.
- If they still don't fit then you can go to the Brands Section to check which bolt is needed for your particular model and request one by e-mail or by calling 1-800-210-9949.
Slide the Metal Adapter Before the GrassGator Head
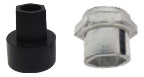
The adapter kit comes with 2 pieces: one metal and one plastic. The metal adapter has a round hole on one side and a hex shaped recessed hole on the other. Slide the metal adapter before the GrassGator head with the hex shaped recessed hole facing down towards the ground.
Install the Plastic Adapter
First locate the bottom of the GrassGator head. The bottom of the GrassGator head is the side with the hex shaped recessed hole. This is the side that should be facing the ground once the GrassGator head is in use. Very important: The hex shaped hole on the GrassGator head will NOT go over the hex on the top of your shaft. The hex hole should be facing the ground.
- On bladed units (3600,4600,4680) and models 4700 and 5620, the bottom is the flat round side, not the triangle side.
- On Fixed line heads like the 8010 and 5600, the bottom is the flat round side, not the side that sticks up.
Insert the hex male part of the plastic adapter inside the hex shaped hole on the GrassGator head (bladed head unit pictured).
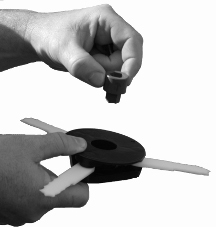
Drop the bolt inside the hex shaped hole on the plastic adapter
Take the bolt you found on step (2) and drop the shank of the bolt inside the plastic adapter. The head of the bolt should be completely inside the hex shaped hole on the adapter.
Screw the GrassGator Head On
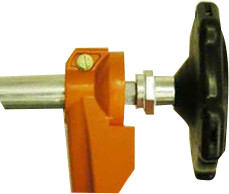
Slide the GrassGator head with the plastic adapter and the bolt in it over the shaft. The GrassGator head will work as a wrench. You may have to start bolt with your fingers but once the head of the bolt is inside the hex shaped hole on the adapter you can then keep turning the GrassGator head until it's tight. There should be no up and down play at all. Any up and down play may damage the GrassGator head or your trimmer. If there's no up and down play and the installation looks like the picture below then, you are done and ready to use your new GrassGator!
If:
- The fixed head on your trimmer is metal and you can't remove the head off your trimmer then we are sorry to say this method will not work and we don't have a GrassGator head to fit your trimmer.
- If you are trying to fit the hex shaped hole on the metal adapter over the hex on the top of the shaft, turn the metal adapter the other way. It will not go over the hex on top of the shaft. The hex hole on the metal adapter should be facing the ground.
You can call 1-800-210-9949 or e-mail us with any questions. Please remember to include the make and model of your trimmer along with your phone number in case we need to ask you some questions. Pictures are always helpful.
Copyright © CMD Products All Rights Reserved